Install Python 2.7 on DreamHost
July 11, 2012 8 Comments
If you followed by last blog post, you saw how to sign up with DreamHost, create a WordPress blog, and start blogging. If you’re a developer like me, however, just using DreamHost’s “One Click Install” isn’t quite enough to satisfy you. In this post, I’ll show you how get a shell account on DreamHost and install Python 2.7 on DreamHost in your home directory!
Enable Shell Access and Reset Your User Password (if Needed)
When you signed up for DreamHost, you selected an ‘FTP User’ account. The first step we need to take is to “upgrade” this user to a full shell account user. To do this, you’ll need to log into your DreamHost Control Panel . (If you don’t have an account, you can sign up for one there. If you use the discount code JALP446 in your sign-up, you’ll get various goodies and I’ll get a commission.)
Once you’re signed in, you need to click on Users…
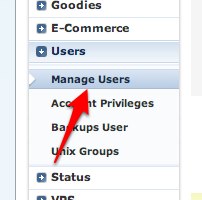
Then click on Manage users
At this point, you can either find the user you created earlier or create a new user. For the purpose of this post, find the user you created when you signed up and click ‘Edit’:
On the edit screen, you’ll be presented with several choices. The important ones are shown in the following screenshot:
Now (or very shortly) you should be able to log in to your shell account. To do this, you’ll need to use an ssh client. For Linux or Mac, ssh is probably already installed. To use it, you just type ssh myuser@mydomain.com (substituting in appropriate values for myuser and mydomain.com, of course), enter your password, and you should be logged in. Windows users might want to use this guide to Installing Putty SSH on Windows. Once you are logged in, you’ll see something like the following:
[sansalvador]$
And now you’re ready to move on to the next step:
Installing Python
If you poke around a bit on the server, you’ll discover that the Python version is likely to be somewhere between 2.4 and 2.6. Let’s grab something more recent. The first step is to download the source code for Python from python.org and uncompress it. We will put everything in a “python” directory under our home directory:
[sansalvador]$ mkdir python
[sansalvador]$ cd python
[sansalvador]$ wget http://python.org/ftp/python/2.7.3/Python-2.7.3.tar.bz2
[sansalvador]$ tar xjf Python-2.7.3.tar.bz2
Now you need to ‘configure’, ‘build’, and ‘install’ Python. We’ll tell ‘configure’ to use our home directory for the installation:
[sansalvador]$ cd Python-2.7.3
[sansalvador]$ ./configure --prefix=$HOME/python
[sansalvador]$ make
[sansalvador]$ make install
If you’ve never followed this approach to installing software, you may be surprised by all the text scrolling by. Do not be concerned. You are not expected to read or understand any of it unless it ends with an error. Note that the build will take a few minutes.
Once you’re done, you can run Python:
[sansalvador]$ ~/python/bin/python
Python 2.7.3 (default, Jul 10 2012, 18:33:47)
[GCC 4.3.2] on linux2
Type "help", "copyright", "credits" or "license" for more information.
>>>
You’ll probably want to put the new Python on your path. To do this, exit out of Python and type the following at the command prompt:
[sansalvador]$ echo 'export PATH=$HOME/python/bin:$PATH' >> ~/.bash_profile
Now if you log out and log back in, you should be able to run Python directly:
[sansalvador]$ python
Python 2.7.3 (default, Jul 10 2012, 18:33:47)
[GCC 4.3.2] on linux2
Type "help", "copyright", "credits" or "license" for more information.
>>>
And that’s it for now! In the next post in this series, I’ll show you how to get a basic web application running on DreamHost. I hope you’ve found this tutorial useful. Please leave feedback in the comments below! Also, if there are particular topics you’d like to see me address, please feel free to note that as well.
Happy hacking!


Pingback: Giacomo Marciani
Pingback: rick446
Pingback: Giacomo Marciani
Pingback: rick446
Pingback: Migrating to DreamHost | MoreHavoc
Pingback: Meredith
Pingback: rick446
Pingback: Anson